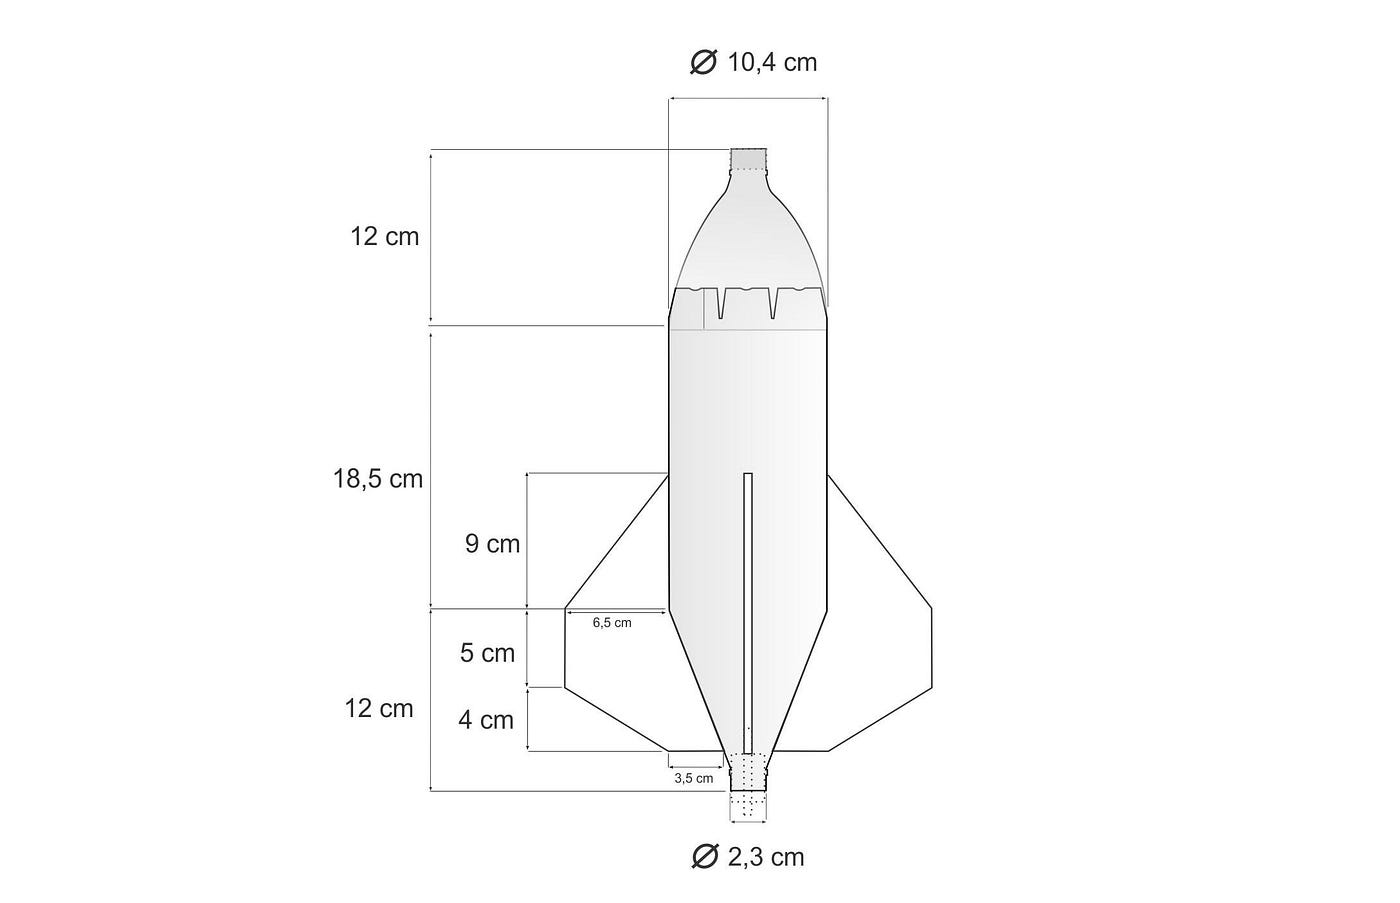
These bottle connectors are useful for Water Rockets because they allow for a modular approach to be applied to your rocket design which simplifies construction and repair of a damaged rocket. 3 Wider fins 14-12 thick provide a larger attachment contact surface.

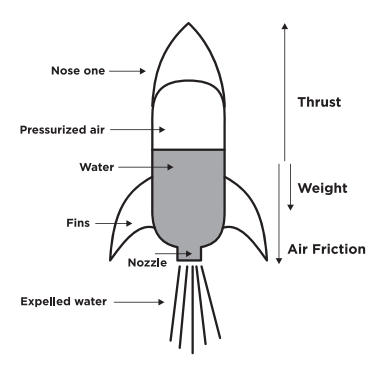
Water Rocket Vector Illustration Labeled Model With Process Explanation Stock Illustration Download Image Now Istock
This video shows how you can make fins and a nose cone from items you have around the house.

. Keep weight to a minimum. Flip the DIY bottle rocket upside down and step back before it shoots away. 2 Be sure fins are well affixed to bottle to prevent separation or deflectionmovement during flight.
They can be securely attached using tape only and are useful for quick assembly. Myth 10 If it looks good it will fly. You should attach the adjacent side to the bottle and the opposite side should be towards the bottom.
This will make your rocket spin when it is launched. Make sure your ns and nose cone are sealed tight on the bottle. Myths about rocket design are everywhere.
Without fins your rocket will not fly straight. Choose a bottle with a shallow curve at the top then use scissors to cut a straight line around the bottle opening the bottom so it can be placed on top of the rocket. Use a launch tube on the launcher.
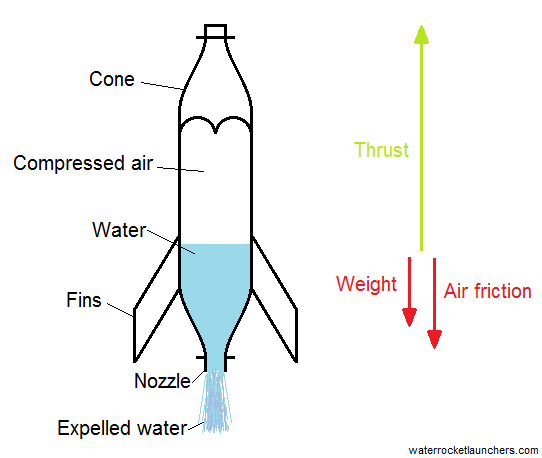
Step 3 Push bottom half of two liter bottle upside down into top half keeps ballast in place. 1 Make certain fins are aligned with center axis of rocket. Understanding these principlesforces thrust.
This chapter should help to clear up 10 of the most common misconceptions about the design of water rockets. You wouldnt want your precious design to fall apart when the rocket is launched with lots of force. Place in top half of the cut bottle.
Bottle rockets are fun. Try to not to make one side heavier than the other- your bottle wont go straight up if it is. Nearly every water rocket design that you can construct will involve some sort of bottle cutting.
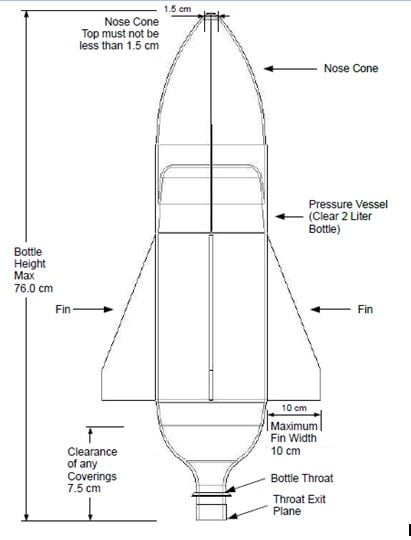
Few students understand the physics principles which determine a rockets flight. Use an optimum sized nozzle. Remember the larger the fins and the further back they are placed on the rocket the further back the center of pressure CP will be thus increasing the stability of rocket flight.
Streamline the body of the rocket to reduce drag. To find circumference use this formula. Before putting the final tape or seal on this plastic bottle nose cone roll the bottle rocket on a flat surface to make sure the nose cone is straight and correctly aligned with the rocket body.
You can use other material for the ballast such as foam peanuts. 2 Be sure fins are well affixed to bottle to prevent separation or deflectionmovement during flight. If it is spinning it means that the rocket is going straight up.
You may also want to put the wings on a angle. Try to not to make one side heavier than the other- your bottle wont go straight up if it is lopsided. 3 Launch Information Your bottle rocket when pressurized to 60 psig can be a very dangerous object capable of causing.
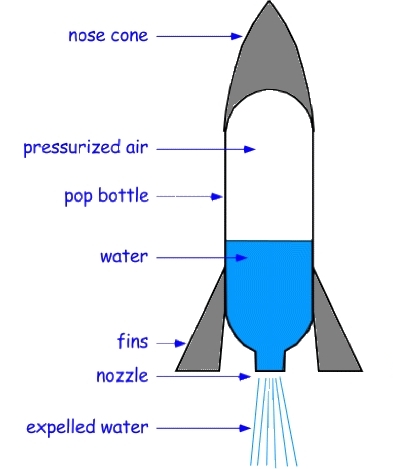
Typically water bottle rockets have three or four fins attached at the neck of the bottle. Use the right amount of water. Written instructions and the scientific.
Use small piece of tape to secure bottom piece inside bottle. 1 Make certain fins are aligned with center axis of rocket. Step 4 Place the un-cut 2 liter bottle pressure vessel into top half.
1 Make certain fins are aligned with center axis of rocket.

Soda Bottle Water Rocket 10 Steps With Pictures Instructables

Professional Water Rocket Guide 20 Steps With Pictures Instructables
How To Make A Water Bottle Rocket Science Project Ideas
How To Make A Water Bottle Rocket Science Project Ideas
Water Rocket With Automatic Parachute Deployment Using Recycling Materials By Jaime Dantas Reverse Engineering Medium
Design Rocket Variables Water Bottle Rockets

Bottle Rocket Towncraft Image Rocket Design Water Rocket Water Rocket Designs
Pop Bottle Rocket Part Iii Force And Mass Science World
0 comments
Post a Comment